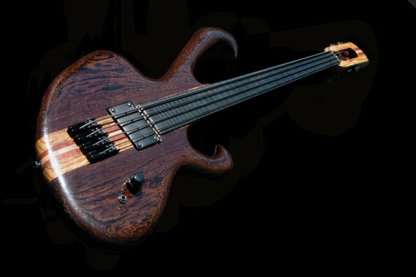
This Hipper has a 30” scale and was a custom order for Mitch. It’s has wenge body and 5 piece zebrano, purpleheart and maple neck with an ebony fingerboard. ABMs individual bridges and a humbucking pick-up complete this bass. There was a lot to do to this bass, but like nearly all Wishbasses it was a solid starting block. First off an all over reshape was required and then a lot of time was spent getting the the neck radius uniform and the fingerboard levelled and radiussed to 12”. Next was slotting the board for position inlays, which have come out very nicely. The pick-up was sitting too high so it was necessary to re-route the cavity to lower this. The pick-up cover was then powder-coated black in keeping with the vibe of the bass as well as the rear cavity cover. Mitch wanted to be able to string this bass through the body so the body was drilled and ferrules added on the rear of the bass. At this time I also filled and re-drilled the mounting holes for the individual briges and spaced these to be even and line up with the pick-up’s pole pieces.
It was now time to route down the area where the individual bridges were. I didn’t want to have too great a drop so I reduced the side of the saddle as well and the action is now down to a nice level. To take real advantage of the pick-up I wanted to add a tone circuit and I decided to do this via a stacked knob, which keeps the front of the bass simple. A black jack input was added as well as black stap locks. An ebony nut was cut and slotted 130-65. I was a little unsure how the 130 would work on a 30” scale so I did also cut a 105-45!
Final touch was ‘cutting’ down as long scale set of tapewound stings to fit and they did - just. The 130 works well - very deep and earthy, but that’s what Mitch wanted. A very nice bass indeed!
Work summary:
Bass restrung and set-up checked. Measurements taken
Strip hardware, tag and bag.
Rough in shape using rasps.
Fine tune with scrapers and sander.
Overall sand at 80 grit
Rout cavity to recess p-up.
Reshape Neck and sand to 800 grit
Fill body cracks with epoxy
Powder coat pick-up cover and rear cavity.
Body sanded to 220 grit.
Fretboard sanded to 220 grit and slotted for position markers.
Filled holes/gaps as required.
Sand body to 400 grit
Sand neck to 400 grit
Add position lines.
Sand/radius fingerboard: 20”
Paint cavity cover
Seal wood
Apply Tru-Oil
Sand-back and polish
Start re-assembly
Notes:
2/2
The bass arrived to me without strings, so I restrung and checked on the set-up. There are a couple of things we’re going to do to this bass that required a little measurement ahead of the work! More on that later. There was quite a volume drop on the 4th string of the bass and on removal of the pick-up cover it was clear that the string was only just over the coil. One of the magnets was out of line, so I removed this and set it correctly and that instantly allowed the pick-up to move another 1/8th of an inch, but we’ll need to rout out the cavity a little to make sure that the strings have optimal line-up over the coil.
The bass was then stripped of hardware.
2/3
I started on the ‘rough-out’ the shape using my trusty rasps and scrapers and I finished off with my hand sander and 80 grit to clean things up. We’re about 95% done on the shape. It just needs a little tweaking here and there, but, IMHO, it looks a nicer without it’s lumps and bumps!
The wenge has a very open grain and it is too open for a regular sealer so I’ll use some epoxy to fill ahead of re-sanding and finishing.
2/4
Recess p-up: as received the p-up was too high, preventing a low action and also restricting play on the upper regions of the fingerboard. The original cavity was also a little uneven, so the re-rout has tidied that aspect up too.
2/5
A little more body sanding and then neck reshaping using my trust microplane and a selction of scrapers. The neck is naturally asymmetric but rather uneven so my focus has been to get an even feel across the length of the neck. It’s coming out nicely.
2/6
Finished off the neck work and sanded to 800 grit. Very happy with the results; still asymmetric but very comfortable.
2/7
More body sanding today. Epoxied the cracks on the top and I’ll do the back tomorrow, ahead of sanding the surface back.
2/8
Epoxied the back. I’ll leave for the rest of the day and start sanding tomorrow. Cavity and pick-up cover away for satin black powder coating
2/9
Sanding today - epoxy has filled the cracks nicely.
2/10
P-up cover is ready for pickup from the powder coaters.
Started to work on the fingerboard and get ready to mark up for the position lines.
2/11
Sanded board to 150 grit and then stained black to give even color. Started to mark out position lines. I will re-stain the board once I’ve cut the slots for the markers.
2/13
More body sanding to 220 grit.
2/14
Position lines are now cut - 30; two and a half octaves worth. Now it’s just a case of adding the actual lines and then final sand and radius.
2/15
I’ve sanded to 400 grit today and filled in some of the large holes in the wood using lacquer and some wood filler around the veneer lines. The bass body is now ready for the final bridge work and re-drilling, before the finishing itself starts. I did apply some sealer to the body to start the process and get an indication of final color. There will be quite a few coats required, but even after the initial application the wood color is looking great!
3/6
The body has been sanded back now post sealer ready for application of the Tru-Oil. Position lines added using black wood inlays. Next step will be to sand down and re-radius the board.
3/7
Inlays have now been trimmed and the board sanded, with only the re-radiussing to do. The out of line bridge screw hole has been plugged and is awaiting cure and sand back.
3/8
Re-radiussed the neck today - 12” - it’s come out really nicely!
3/9
Not happy with how the bridge screw holes are lined up, so I plugged these and I will re-drill. My old drill press has finally given up the ghost so I’m currently awaiting a new one. In the meantime I’m going to rout down a little to seat the bridges a little lower.
3/10
Routing completed.
3/11
Still awaiting the new drill press. Measured and marked for the drill holes.
3/21
After a frustrating wait the new drill press arrived on Friday and is now set-up and operational.
First step is to drill for the individual bridges and thro’ holes and then the application of the finish can start.
Bridge screws holes drilled. Through holes drilled. Recess holes for the string ferrules drilled. Good all over sand to 600 grit. There are a few very small areas that need re-filling - such as the veneer, but we’ll be starting the final finishing tomorrow.
3/22
Filling completed. Fretboard sanded and polished. Final rub down and seal of bass. Buff down sealer coat with 0000 steel wool. Ready for first application of TruOil tomorrow.
3/23 - 3/30
Tru-oil coat count: 25
I’ve posted some progress shots of the bass with the Tru-Oil building.
Final coat has been applied and now it’s just a case of leaving everything to sit for a few days before the final sand back and polish and then reassembly and set-up. Nearly there!
4/1 - 4/11
Sand back and polish completed. Re-assembly starts! Pick-up cavity has been shielded using conductive paint. Rear cavity has been shielded with copper tape. I had to rout out the control cavity for correct fitting of the harness. Black string ferrules and strap buttons fitted. Black tuners re-fitted. Wiring harness built, stacked volume/tone with a sprague orange drop capacitor and black jack input.
Nut installed. Bridges re-installed with ground wire. Wiring harness installed.
Nut slotted for B-E-A-D tapewounds. Cavity cover re-installed. Fingerboard protective tape removed; fingerboard cleaned and polished. Bridge saddles re-sized and re-painted. Bass re-strung and set-up.