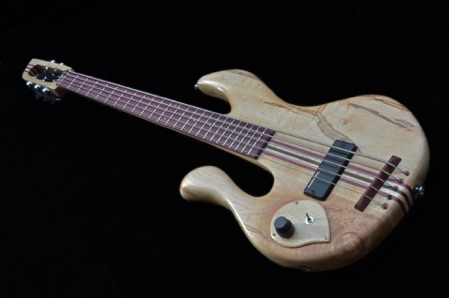
This an early Wishbass; #156, from back in the day when Steve W still burned his name on the back of the bass. It’s also one of the rare fretted Wishbasses and it’s a five string! It’s current owner, Kevin B already has another of my refin’d Wishbass, #1113
The bass is maple with two piece wings. The neck is 5 piece, maple, purpleheart and walnut. The fretboard is purpleheart. It is very much a slab bass, a bit like an early precision with a small radius round over. The Kent Armstrong Soapbar was wired to a volume control and jack input, but as part of the refin it was wired to a three way switch to allow coil series, split and parallel switching. A stacked volume and tone control was fitted. Sonically this bass has a wide variance of available tone, with great punch, as you’d expect from a maple bass with a hot pick-up.
The bass came with a huge headstock and as part of the refin this was reduced in size, which benefits ergonomics as well as balance on a strap too.
The lower and upper horns were reshaped and the overall curve of the bass was tidied up. It was finished with TruOil but not polished to a high gloss, rather it was polished to a satin finish.
Refin Work:
Stripped Bass of hardware
Slim down headstock
Sand and shaped to 80 grit.
Belly Cut
Reshape neck, sand to 120 grit
Drill recessed hole for side input jack
Fabricate maple cavity cover and maple knobs
Clean up rout for p-up.
Remove excess fingerboard
Sand and shaped to 100 grit.
Edge contour.
Shape/sand body to 220 grit
Shape/sand neck to 220 grit
Filled holes/gaps as required.
Re-rout pick-up cavity
Sand fretboard to 800 grit
Sand body to 400 grit
Sand neck to 400 grit
Level, re-crown and dress frets
Seal wood
Apply Tru-Oil
Oil fretboard
Sand-back and polish
Shield cavities
Redo wiring harness add tone control with parallel/split/series switching
Fabricate Purpleheart nut
Fabricate Purpleheart bridge
Refit original hardware
Fit pick-up with foam
Final set up
Notes:
- Stripping a Wishbass of it’s hardware is the first step before a refin. Nut’s can sometimes be a little touch to get off, but I find a steel rule and a rubber mallet is the best way to free a tough nut. Place the ruler end against the nut and a gentle, but swift tap should remove the nut.
- After marking out the new shape for the headstock I carefully removed the excess using a belt sander and used a detail sander to do the final finish.
- I use a stepped drill in a drill press to drill side input jack holes for the StewMac.com flush mount jacks that I use.
- An old iron (thanks Mrs Thunderitter!) is a great way to heat up a fingerboard to loosen the glue beneath it for easier removal. I used a saw to carefully cut the fingerboard down to where it met the body wood, making sure I protected the areas on either side of the saws path using gaffa tape. I then used a spreader to carefully loosen the board from the glue and everything popped off nicely. A quick sand to get rid of the glue staining and soften perpendicular edge and it’s done.
- Steve W’s construction usually means a little extra neck blank at the edge of the finger/fretboard particular when this meets the body. Using a selection of rasps and sandpaper I reduced this and reshaped it to provide a more aesthetic blend.
- Lots of sanding now, ahead of applying the finish.
-
-The original pick-up cavity was a little shallow so I re-routed this to allow the pick-up to be mounted on foam, which will allow for height adjustments.
-
-I’ve wired the humbucking p-up to be switchable between a single coil/series/parallel setting. This in turn is wired to a spilt pot for tone and volume control and then to a flush mount jack.
-
-To go with the ‘board I thought a Purpleheart nut and bridge would look nice.
-
-Next job is to get the hardware back on and start the iterative process of set-up.
- Plugged in: This bass is a tone monster, especially in parallel mode