
#804 is a Lobe model. It has a purpleheart top, mahogany back and a mahogany, maple and purpleheart neck. The fingerboard is some of the wildest wenge that I’ve seen, which as wenge can be prone to splintering, I think I’ll finish with epoxy! As you can see #804 had a bit of an accident before it came into my hands. Only one thing for it I thought: headless baby!
The first task was to get the finish off of the body and neck. I used Citristrip and a plastic scraper for this. With the finish off, the next step was to make a plaster cast of the end of the neck in order to have a custom end-piece fabricated by David King of www.kingbass.com. I looked at various options for the bridge end and having ordered a cheapie from eBay, that ended up being a piece of junk, I decided that individual tuner/bridges from ABM, like my LeCompte was the way to go. David King was kind enough to supply these with his end piece.
While I waited for the end-piece to be made I sanded and radiussed the fret board (9.5”). When the headpiece arrived it was a great fit, especially considering my casting skills and the fact that it was made ‘blind’ from the neck by David King. I used a tool-making plane, rasps and sandpaper to get the end of the neck level for the marry up with the end-piece. The end-piece came with a brass nut, which will require shaping and slotting.
At this time I used a center punch to knock in the aluminum fret markers on the bass as with the reduced neck they are now in the wrong place. Next step will be to fill these with a brown epoxy.
Having done the mock-up for the bridges I’ve settled on a 33” scale length, which is the same as my Riverheads. I’ve routed a recess to allow the ABM tuner/bridges to sit lower and I’ve also done a cut-out at the rear to allow for better access to the tuners.
Finally finished the fretboard, which took rather longer than I had thought. In the end I went with more of an epoxy impregnated finish than a full on epoxy.
I decided to fit a quad coil Delano pick-up to the bass, so that required a little routing to open up the single J cavity for the wider Delano. I also routed down to take account of the lower bridges so that the p-up doesn’t sit too high. I’ll wire this to a micro switch which will let me wire it single/series/parallel.
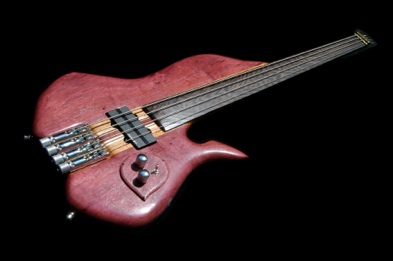
I’ve decided to go with a matching purple heart cavity cover, which I’ll seal and Tru-Oil.
I’ve now drilled the side jack input and fitted the Schaller strap buttons. I decided to go with three buttons; one behind the top of the upper bout and the other two on either side of the bridges, which will allow the bass to either sit neck up on the top button or more horizontal on the bottom one.
I’ve now shielded the cavities and mounted the p-up, which has been wired to a three way switch up (on/on/on). The volume and treble pot have been wired and I am currently just awaiting some screws and a capacitor. The cavity cover has been drilled and I’ve got a nice set of chrome knobs, which match the bridge. Capacitor and tone control fitted and everything wired and working: that’s always a relief! I still need to fit some kind of position markers - watch this space - but first impressions are that this is one awesome bass. Tone and playability are amazing.